I found out that using the new version of 3ds max made it harder to find the icons that was being shown in the videos as the versions were different. the guy on the video didn't tell you what happened if something didn't work so we then either had to find it out for our self's of ask the lecture.
some of the things shown in the videos did not work, for example the last stage of the 12th video did not work in photoshop in creating the tile texture. and i could not find a way around this to make it work.
creating the lips didn't go to well for me as the image of my lips was not a good image to work from
doing the uvw unwrap didn't work for me for the first few times that i did it, and couldn't find out what i was doing wrong so i wasted alot of time doing that.
when doing the map for the ear i think now it would of been better in selecting just the ear and not back of the ear, this is because you are left with a joining line.
I think if i re-did my face again i would be able to get it done alot quicker and better.
Thursday, 21 October 2010
what went well
using the image i found it easier drawing on the polygons first so i had a guide line to follow, doing this made it better for me to create the face of my face. By having the videos i could work at my own pace and teach my self new techniques.
I was pleased with my final model i think it looks a bit like me, well the shape of the face is the same.
using the hair tool was fun and easy to use, creating the skin texture went rather well, mapping the face out in photoshop took allot of time but was worth it in the end.
the ear texture and style went well and was probably the part i was most pleased with.
eye

i found an image of someones eye on the Internet picked the bits that i wanted making the background a gray colour and imported the image to 3ds max creating a sphere and putting the material on it using the uvw mapping gizmo to make it fit.

morpher

i then used what i learnt in the other lesions to animate my face making it open and close its eyes smile and puffing out my checks


hair

creating the hair i slected the polygones that had hair on it i then copyed it creating a roman helmet. i then clicked on the modifier tap and slected hair and fur then using the cutting tools to cut the hair. and then i changed the colour of the hair to the same colour in the image. i then tryed to make the hair curly but couldnt find a way to do this.


stage 12

creating the spectrim in photoshop which shows the oiley parts of the skin i then added this to 3ds max in the same was as the bump, but adding this image in the spectrim level. i then played around in 3ds max till i ws happy with the amount of shine there was.

stage 11

creating the skin texture, i used the image in of the map that i had created. i then click on desaturate, i then choose the levels by clicking on levles changing the scale. i then used the stamp tool to take out any hard edges i saved this file as bump.

i then imported the image over to 3ds max on the materal of the face i clicked on maps then bump and added the bump file i created.

i then mixted it with a nois modifire setting the settings to fine to get a good skin texture.


stage 10 b

mapping of the ear. making sure the image fits in the ear by using warp


finish map, once finished save it as a tiff you can then go to 3ds max apply it as a new materal and it will fit over the mesh. if i needed to update the image i would change it over photoshop and save it and it would update in 3ds max.

stage 10 A

open the mesh on photo shop and use the image of you face to create you face over the mesh.

stage 9 b

once you have mapped out one side you then need to go on the modifier list above symmetry and pick on the modifier list unwrap uvw then click on face and edit then have pick element selected select the mirrored side and mirror it over on the uvw map, do the same for this for the ear. once that is done you then need to weld the seams together. by selecting the vertex and using ctrl w to weld then.

now you can see both sides are mapped.

you then need to render the mesh and save it as a tiff.

rendered mesh showing no over lapping faces.
stage 9 a

first we applied a checked patten. we went down in the modifier list and clicked on uvw mapping unwrap then selected the whole face but not not ear. then click on edit on the right hand side. the idea was to create the same size checked squares on the face. i did this by using the relax tool. you can relax by centre, angle or by face., the relax by centers i used on the nose and the mough and the relax by angle i used on the top of the head.

creating uvw map for the ear you needed to use pelt before doing this you need to select the ear, you need to create a point to point seam, to do this click on point to point seam and pick a point from behind the ear and point on the front of the ear, you need to make sure you click the point that is in align with the one that you select first. Then click plain making sure the plain is on the ear, click fit and then click pelt., the start pelt and this will unwrap the ear out and map it for you.

finish map as you can see the squares as the same size.
stage 8

creating the ear we painted the lines on in photoshop then imported the image over to 3ds max and created the polygons like we did to the face.

then made one of then converted one to an editable poly and attached the rest.

then started moving them around to create the indents to the ear.

finished ear smoothed.

Wednesday, 20 October 2010
stage 7

creating the back of the head, i created a sphere created the same amound of polygones in it and thenjoined them to the face by using th e snap tool.

i then held down shift copying the polygones to create the shoulders and shape it to the image.

i then attacked the back of the head to the frount.

Friday, 15 October 2010
stage 6
stage 6 we needed to close the gap in the mouth and the nose, i did this by selecting the edges of the polygons around the nose, hold down shift to copy and drag them out, joining up the edges using the weld tool to connect the points together. once i created the outline of the inner nostril, i then created a polygon to represent the inside of the nostril and the extruded it up into the face not to far just enough to create the illusion to look right. i used these steps again to create the lips.

as you can see in this image with the lips and nostrills extroded i then moved the vertix's around to try and get the best fit.


as you can see in this image with the lips and nostrills extroded i then moved the vertix's around to try and get the best fit.


moudling the face stage 5
on stage 5 i then needed to make the mesh that i created 3d so i went to the left view and started dragging out the vertex's only using the x axis i found it much easier selecting the vertex's on the front view so i could then see where they had to go. and also making the mesh see through i did this by right clicking selecting object properties and ticking the box see through.

moudling the face stage 4
once the image was in 3ds max i then needed to create polygons using the line tool. making sure snap was on so i could then make sure the polygons were connected. once i had drawn all the polygons tracing the image, I then needed to right click on one of the polygons and go to convert to editable poly. i then needed to attach the other polygons i did this by clicking attach on the tool bar and then selecting the other polygons,

once this was done i ended out with a mesh.


once this was done i ended out with a mesh.

Wednesday, 29 September 2010
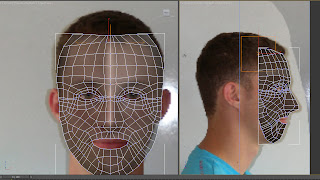
modeling the face stage 3
next we needed to import the image into 3ds max. we had to create a plain with one polygon. we then went to materials and added the materal of our face with the lines on it. you can either save the image you one in photoshop are a jpeg of you can import the file saved from photoshop. i also found out that when importing the image 3ds max distorted the image to get around this i had to go to customize- preferences- view ports- configure driver then on background texture size tick match bitmap size as closely as possible and on downloaded texture size tick match bit map size as closely are possible. once you have done that click OK and reapply the material again. You may need to do this every time you open up this file.

once this is done to make sure your plain does not get a shadow on it when you turn the image you need to go to materials and change the colour to 100%

once you have done that you then need to fit the bitmap to the plain. to do this you need to go on the modifier list - uvw maps and the on that screen click on bitmap fit, this will then make the bitmap to its saved size. once that is done click ont uvm mapping and then click on Gizom this will alow you to move the image on the plain, move the image in to the centre of the plain. once you have done that use the rotate tool home down shift and move the image 90 degreas this will copy the image. then use the modifier gizom to move the image to the side of the face

you then need to freeze off the plains to do this you need to select the plain click on object
properties tick the freeze and untick show frozen objects in grey and do the same for the other one.

Subscribe to:
Posts (Atom)